
What is a Forest Bonsai?

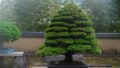
A forest bonsai is a style of bonsai that recreates a miniaturized version of a natural forest.
Unlike the traditional single-tree bonsai, a forest bonsai features multiple trees planted together in a single pot, arranged to mimic the harmony and unity found in nature. Each tree plays an essential role in forming a unified group, where no individual tree stands out alone, but together, they create a landscape that feels organic and cohesive.
The group of trees is treated as one entity, arranged carefully to achieve balance, stability, and a natural sense of variation.
Selecting Trees for Forest Bonsai
Choosing the right trees for your forest bonsai is one of the most important steps in creating desired scenery. The trees you select should work together to form a unified group, yet maintain enough variation to keep the arrangement dynamic and engaging.
When selecting trees for your forest bonsai, think of them as part of a single ecosystem rather than individual specimens. The trees should complement each other in shape, color, and texture to create a harmonious overall appearance.
Here are some key factors to consider when selecting trees for your forest bonsai.
Tree species

Popular choices of forest bonsai include:
- Pine, spruce, cypress, juniper
- Japanese maple, trident maple, Zelkova, elm, beech
- Azalea, camellia, plum
These species work well in groups because of their ability to create a balanced, natural look.
Tree characteristics
Leaves

Japanese zelkova leaf
Choose trees with beautiful green, small, and dense foliage. It’s even better if the trees in the group share similar leaf characteristics (like from the same parent tree).
Trunk

Japanese elm
Select trees with minimal scars, uniform Tachiagari (the base of the trunk) and similar trunk curves. Varying the thickness of the trunks among trees will help avoid a boring, unappealing appearance.
Branches

Needle juniper branching
For the main trees, choose ones with well-formed, finely-ramified branches. For other trees, the branches don’t need to be as meticulously shaped as in single-tree bonsai.
Roots
Select trees with roots that spread out horizontally in all directions rather than growing straight down vertically. When you plan to make your forest bonsai in a shallow pot, this feature will help you a lot.
If the roots are underdeveloped or growing downward, prune the part you do not need and let the trees grow in a smaller, shallower pot for 1-2 years to encourage lateral root development.
Tree size and proportion

Variation in tree size is critical to creating depth and perspective in your forest bonsai.
When selecting trees, aim for a mix of sizes to give the arrangement more visually interesting. Larger, more prominent trees should be placed toward the front of the composition to serve as focal points, while smaller trees should be positioned at the back to enhance the illusion of depth.
In addition to height, trunk thickness also plays a crucial role in forest bonsai design. The trees should vary in thickness, with the thickest trunks typically belonging to the tallest, most mature trees. This gives the impression of an established, long-standing forest.
Choosing the Right Pot
Selecting the perfect pot for your forest bonsai is a vital step in creating a cohesive and visually striking display. The pot acts as both the foundation and the frame for your composition.
As one of the important elements of forest bonsai is the expression of a vast landscape, the pot you choose should evoke that image.
Here are key factors to consider when selecting the right pot for your forest bonsai.
Pot Size

Maple forest style with oval pot
Since you’re creating the illusion of a vast landscape, the pot should be big enough to reflect that image and accommodate multiple trees. In this sense, wide and shallow pots are ideal for forest bonsai.
The shallow depth encourages the visual illusion of an expansive forest floor, while the width gives ample space for arranging trees the way you want.
Pot Shape

The shape of the pot also influences how your forest bonsai is perceived. The pot shape you choose can either reinforce or contrast the lines of your tree arrangement.
Rectangular pots are ideal for coniferous trees with strong, straight lines that complement an orderly tree arrangement.
Oval or round pots create a softer, more organic feel, which is suitable for deciduous/flowering trees. They are often preferred because they create a more seamless transition between the trees and the ground, blending both trees and the pot well together as one.
Color and Finish

The color and finish of the pot should enhance the visual appeal of your forest bonsai. When selecting the color and finish, consider how it complements the foliage in different seasons and overall aesthetic of your trees.
Unglazed, muted, earthy tones like browns and grays work well with coniferous trees, as they complement the color of foliage all year round.
For deciduous trees that change color in fall and lose foliage in winter, avoid colors that are the same in that season. Off-white and soft blue pots work well for these trees. Subtle glaze in a natural color is better as it adds a touch of elegance without overpowering the oveall look.
For more about choosing the pot, please check the following post.
Designing Forest Bonsai Layout
A well-planned layout is key to capturing the natural beauty of a real forest while creating a cohesive and balanced composition. The goal is to replicate the feel of a miniature landscape, where trees grow together in harmony but retain a sense of natural variation.
The Principle

One of the core design techniques in forest bonsai is the use of odd triangular patterns to achieve balance and visual interest. This principle helps create a natural flow between the trees and draws the eye across the entire composition.
Selecting Main Trees
In any forest bonsai, the three largest trees act as the primary focal points or visual anchors. These trees—the largest, second-largest, and third-largest—serve as the main framework around which the rest of your forest is designed.
When choosing these trees, prioritize those with thicker trunks, as developing trunk thickness takes much longer than adjusting height through pruning. Selecting trees with the right thickness from the start helps establish a strong foundation for your bonsai.
Grouping in odd numbers
Another key design principle of forest bonsai is to use an odd number of trees—this helps create a more harmonic and balanced composition yet dynamic and visually interesting. Even numbers tend to create a symmetric composition with a pattern, which can make the arrangement look boring and artificial.
There can be one group of trees or two or more groups in a single pot. In any event, a group should be comprised of odd numbers of trees to create an irregular but harmonic scene.
Varying sizes
To make your forest look like a natural landscape, incorporate trees of various sizes: tall, short, thick, and thin.
Larger trees should be positioned towards the front, while smaller ones are placed towards the back to create a sense of depth. This arrangement mimics the way a forest recedes into the distance and gives your bonsai landscape a captivating, three-dimensional feel.
Creating asymmetric triangle
Arrange the trees in a way that forms an irregular triangle when viewed from the front. Each grouping of trees, if any, should form an irregular triangle form as a whole. This asymmetry adds visual interest and mimics the randomness of a real forest.
Positioning: Creating Depth and Perspective

When designing a forest bonsai, the arrangement of the trees is key to creating the illusion of a vast, natural landscape within the pot. To achieve this, it’s important to follow specific guidelines for positioning.
Creating Space and Depth
To make the forest bonsai feel expansive, plant the trees closer to either the left or right side of the pot, leaving an open area on the opposite side. This asymmetry creates the illusion of a wide, open landscape, making the forest appear more spacious.
The group of trees is typically positioned at a 7:3 or 6:4 ratio within the pot, ensuring that one side is more densely populated, while the other has open space.
Avoid Overlapping
From the front view, it’s crucial to make sure the trunks don’t overlap completely, as this can obscure the trees behind and makes lose the illusion of depth in the forest.
Expressing Distance
To create a sense of depth and varying perspectives, plant tall trees with thick trunks in the foreground and smaller, thinner trees towards the back. This arrangement mimics the look of a distant forest, giving the composition dimension and realism.
Varying heights and distance
When arranging the trees, make sure they vary in height. If you were to draw a line connecting the tops of the trees, it should form an irregular triangle, which adds a dynamic, interesting quality to the design.
Also, avoid placing trees in an equal distance, which can look unnatural. Instead, stagger their positions, allowing the trees to overlap slightly when viewed from the front. This technique helps create layers within the forest and gives the impression that the trees are growing together in a dense, interconnected environment.
Planting Forest Bonsai
Once your forest layout is designed, it’s time to plant your trees and bring your vision to life. This stage requires careful attention to detail, as the positioning, depth, and overall arrangement of the trees will determine the long-term success and aesthetic appeal of your forest bonsai.
Step 1: Preparing pot, soil and root anchor
Before planting, it’s important to prepare pot and soil as well as a root anchor to create a stable environment for your trees.
Preparing pot

Pot bottom net
Place a mesh over the drainage holes in your pot to prevent soil from falling out while still allowing water to drain.
Preparing root anchor
To securely anchor your trees in the shallow pot, it’s important to create a solid root anchor. A well-secured root system ensures your forest bonsai remains stable and grows healthily.
This can be done by placing a coarse mesh-like structure at the bottom of the pot and securing it to the pot. Tie several wires at an even distance to the root anchor to secure roots to the anchor.
The mesh allows you to tie the roots down, ensuring they stay stable during planting and as they grow.
You can use materials like metal mesh or pot mesh, as long as they are strong enough to firmly anchor the roots. Or chopsticks that are tied as mesh can also work as a simple and effective solution if the mesh isn’t available.
Preparing soil

Akadama and Kanuma soil
When selecting soil for your forest bonsai, it’s crucial to ensure excellent drainage, especially when using shallow pots. Shallow pots lack the depth to drain excess water by gravity, so a well-draining soil mix is essential to prevent water from stagnating and keeping the roots too wet.
A typical bonsai soil mix includes a blend of akadama, pumice, and lava rock to promote aeration and water retention. For forest bonsai, it’s recommended to use a slightly more porous mix that drains quickly while still retaining enough moisture to support the trees in the shallower pot.
Mix the soil well. Add a thin layer of coarse, well-draining substrate at the bottom of the pot to improve drainage. On top of this, spread your bonsai soil mix evenly across the surface.
For more about bonsai soil mix, please check the following post.
Step 2: Positioning the Trees
Start with the main trees. Begin by planting the largest or focal-point tree first. This tree will serve as the anchor of the design, so make sure it is positioned according to your original layout plan.
Then plant the rest of the main trees.
Once the main trees are in place, position the remaining trees according to your layout. As you plant, check the positioning from multiple angles to make sure the composition appears balanced from the front.
Adjust and change the placement of each tree if necessary to achieve a cohesive look. Remember, taller trees should be planted towards the front to provide depth, while shorter trees can sit at the back for a better composition.
Also, at least some part of every tree should be able to be viewed from the front and not completely hidden.
Step 3: Securing the Trees

Once your trees are positioned, it’s important to secure them properly to ensure they remain stable while their roots establish in the new soil.
Using the wires attached to the root anchor, loop the wire around a section of the root system and twist it securely. Make sure the tree is firmly secured so that it will not wabble with wind or rain.
Step 4: Adding Soil

Gently fill in any gaps between the roots with soil mix, making sure that the roots of each tree are fully covered. Use a chopstick or small tool to poke the soil in, ensuring there are no air pockets around and between the roots.
Then, spread the soil evenly across the surface of the pot. Slight mounding around the base of each tree can create a more natural look.
To enhance the aesthetic of your forest, you can add surface elements like moss, small stones, or gravel. Be sure not to overdo it to allow soil to dry out after watering.
Step 5: Aftercare

After planting, water your forest bonsai thoroughly until water runs out of the drainage holes. This helps settle the soil around the roots and ensures that the trees receive enough moisture to establish themselves.
At least for a couple of weeks after planting, protect your bonsai from harsh sunlight, heavy rain and strong winds. This gives the trees time to adjust to their new environment and reduces the risk of transplant shock. Keep your forest bonsai protected until the roots are grown and firmly grounded in the pot.
If you’d like a video explanation, please check my video!