- When to repot Japanese maple bonsai
- What you need to repot Japanese maple bonsai
- Repotting A Japanese maple bonsai- Complete Steps
- Step 1: Remove the tree from the old pot
- Step 2: Remove old soil from the tree’s roots
- Step 3: Prune the roots and branches
- Step 4: Test the position of the tree in the new pot
- Step 5: Place a pot bottom net in the new pot
- Step 6: Put some of the bonsai soil mix
- Step 7: Reposition the tree and spread the roots evenly
- Step 8: Put the rest of the bonsai soil mix
- Step 9: Secure the tree using wires/strings
- Step 10: Water the tree
- Step 11: Avoid strong wind and direct sunlight
When to repot Japanese maple bonsai
Which time of the year to repot
Best time to repot
The best time of the year to repot Japanese maple bonsai is just before they sprout. Japanese maple trees sprout when the average temperature warms up to around 50°F (10°C). It depends on where you live but it should be around March to April. Japanese maple trees are quite sturdy so you can repot them late in the spring as well.
You may also be able to repot your trees in fall if you live in a warm region. But it is better not to do so under colder climates because there may not be enough time for new roots to grow before the temperature drops. They may not need many roots because they are dormant in winter but they need to store energy in fall to survive the cold season, which can be used up to overcome repotting stress.
When not to repot
Avoid repotting during summer and winter. The growth of bonsai roots largely decelerates under a hot and stressful summer climate, after vigorous growth in spring. There is almost no root growth during winter and repotting can make them go through too much stress.
How often to repot
In general, Japanese maple bonsai trees should be repotted every 1-2 years when they are young and every 2-3 years when they mature.
You have to check the soil and roots as well. If the soil in the pot has broken down and is no longer providing good drainage or the roots are pot-bound, you have to repot your trees despite the recommended frequency.
Please note that repotting fully-grown Japanese maple bonsai trees more than necessary should be avoided. The root system of Japanese maple trees is known to grow strongly and repotting the Japanese maple bonsai trees more than necessary leads to unwanted vigorous growth that can deform the bonsai style.
What you need to repot Japanese maple bonsai
To repot a Japanese maple bonsai tree, you need;
-
- new bonsai soil mix
- a pot bottom net
- a new bonsai pot
- bonsai scissors
- wooden chopsticks and
- string/wire.
Bonsai soil mix
Recommended soil mix for Japanese maple bonsai is;
-Akadama: 80%
-River sand: 10%
-Organic compost: 10%
Akadama is unique in the sense that it checks all the boxes to be a good bonsai soil. But it is quite expensive to purchase outside Japan. If you do not want to spend that much for Akadama, the followings are good candidates for Akadama alternatives.
-
- Vermiculite
- Lava rocks
- Pumice
To know how to make bonsai soil and more about Akadama alternatives, please check the following posts.
Bonsai pot
Deciduous bonsai trees like Japanese maple are usually potted in porcelain pots. Japanese maple trees are vibrant and full of color with beautiful leaves. This kind of theatrical beauty best matches fine, decorative and lively porcelain pots.
A shallow, oval- or lotus-shaped pot in blue is a perfect match.

Japanese maple bonsai tree in oval, blue pot
If your trees are in the training phase, a clay pot is ideal for their healthy growth.
To know more about which pot type to choose, the following post might be helpful.
Bonsai scissors
Bonsai scissors are different from ordinary garden pruners. They are made especially for the purpose of pruning tiny leaves in dense foliage and cutting off roots cleanly. Ordinary bypass pruning scissors are not for fine pruning and there is a risk of damaging roots and tearing branches.
These traditional bonsai scissors with a long shank (Ashinaga) shown below are my first choice because they are for general-purpose bonsai pruning that is good for both branch and root cutting.
Wazakura Ashinaga Bonsai Scissors
For more about bonsai scissors, please check the following post.
Repotting A Japanese maple bonsai- Complete Steps
Step 1: Remove the tree from the old pot

Remove the tree from the old pot.
Refrain from watering for 24 hours so that the roots and soil can be removed from the pot easily.
- Tap the rim of the pot several times and see if you can loosen the tree from the pot;
- Secure the tree, lean the pot at an angle and gently tap the rim of the pot; or,
- Use a small wooden (or metal) spatula/knife to gently make vertical cuts alongside the pot. Grab the bottom of the trunk and tease it very gently until you can loosen the tree.
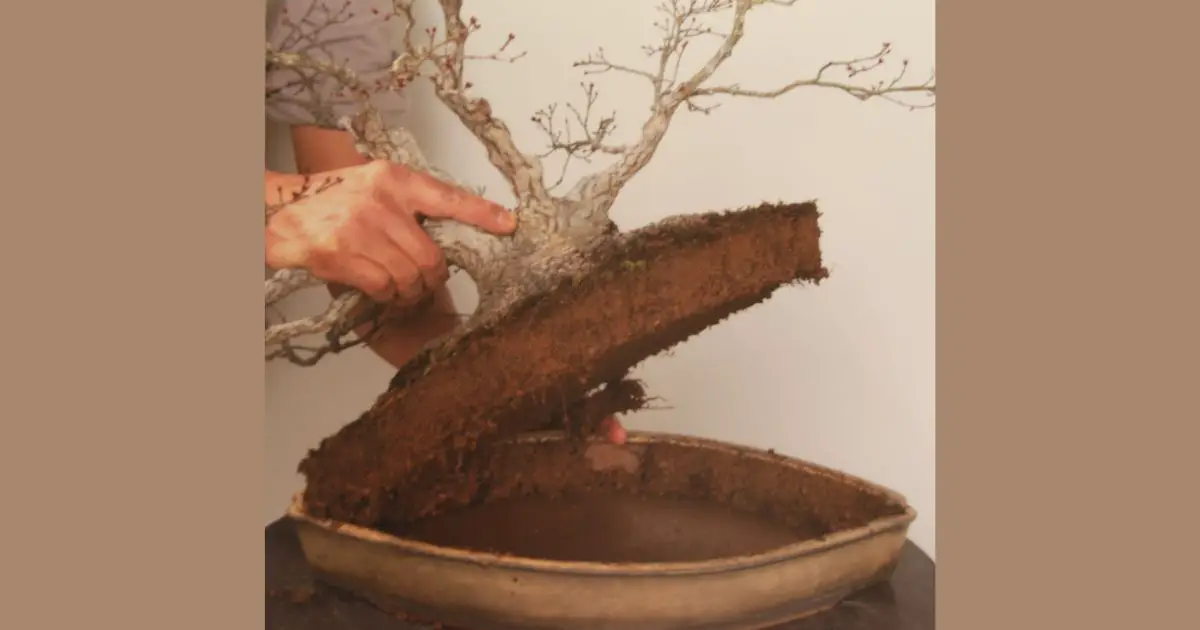
Step 2: Remove old soil from the tree’s roots

Remove the soil with a chopstick
Using a wooden chopstick, remove old soil from the tree’s roots so that you can observe the root system clearly. For younger trees, you can remove all the soil and for mature trees, 2/3 of the old soil.
Younger Japanese maple bonsai trees tend to grow too vigorously if the old soil is completely replaced with a new one. The branches will be elongated and too many shoots will come out. Leaving 1/3 of old soil can suppress the growth of your bonsai trees in a good way.
Step 3: Prune the roots and branches

Prone the roots.
-
- roots that are especially bigger, thicker than other roots;
- roots that disturb other roots when they are spread in all directions;
- overgrown roots that are longer than the depth of the new pot; and,
- dead or damaged roots.
The surface area of the cut should be of the minimum, and not diagonal (not an angle) so that the wound is healed quickly.
Japanese maples are relatively strong, so pruning a lot of roots is usually okay. That said, do not prune all the big, thick roots if your trees’ root system has not yet developed fine roots.
After pruning the roots, cut the same amount of branches as the roots. When roots are taken, the above-ground parts have to be removed to the same extent because a smaller amount of roots can only sustain a smaller amount of branches and leaves.
Step 4: Test the position of the tree in the new pot

-
- Decide the front of the tree and that of the pot.
- Put the tree in the new pot to test if its position is balanced.
- The tree can be positioned in either the center or towards the edge of the pot.
Step 5: Place a pot bottom net in the new pot

Place a pot bottom net.
Place a pot bottom net in the new pot to cover the drainage hole(s). If the mesh of the net is too large for the new soil, you can use the fine-mesh screen used in the screen door. Secure with wire if necessary.
Step 6: Put some of the bonsai soil mix

Put some of the soil mix.
Step 7: Reposition the tree and spread the roots evenly

Reposition the tree and spread the roots evenly.
-
- Carefully place the tree in the new pot.
- Keep in mind that the front of the tree and the pot is in the position decided in the previous step.
- Spread the roots evenly in every direction so that good surface roots (nebari) are developed.
Step 8: Put the rest of the bonsai soil mix

Put the rest of the soil.
-
- Hold the tree in place and put the rest of the bonsai soil mix in the pot.
- Use a wooden chopstick to gently push the soil into the air pockets.
- Add more soil and push the soil in between the roots.
- Repeat the process until all the gaps are filled and the soil is at the level just below the rim of the pot.
Step 9: Secure the tree using wires/strings

Secure the tree using wires/strings.
Secure the tree to the pot using wires/strings. The roots of the tree should be locked and immovable in the soil until the new roots regenerate.
Step 10: Water the tree

Step 11: Avoid strong wind and direct sunlight

Avoid strong wind and direct sunlight.
Do not let the new soil dry out and avoid strong wind as well as direct sunlight for a week after repotting. Wind and sunlight can be stressful to newly repotted trees.