- How to start rock style bonsai: Introduction
- How to start rock style bonsai: Preparation
- How to start rock style bonsai: A step-by-step guide
- Step 1: Gather the necessary tools and materials
- Step 2: Select the rock
- Step 3: Choose the tree
- Step 4: Decide the composition
- Step 5: Prepare the rock
- Step 6: Mix the soil
- Step 7: Undercoat with the soil mix
- Step 8: Prepare roots
- Step 7: Attach the tree to the rock
- Step 8: Secure the tree and the roots
- Step 9: Overcoat with the soil mix
- Step 10: Finishing touches
- Step 11: Aftercare
How to start rock style bonsai: Introduction

History of rock style bonsai
The rock style bonsai represents an emulation of trees growing in challenging environments, such as mountain cliffs or rocky seashores.
The origins of rock style bonsai trace back to Chinese Penjing. The initial form of Penjin used plants, stones, water, and soil as elements to recreate the landscape in miniature.
Over time in Japan, Penjing evolved into 2 different art forms: (1) bonsai, which uses trees and soil, and (2) Suiseki viewing stone, which uses stones. And the combination (of a kind) of both bonsai and Suiseki viewing stone is bonsai-on-rock style.
For more about the history of and the connection between Suiseki viewing stone and bonsai, please check the following post.
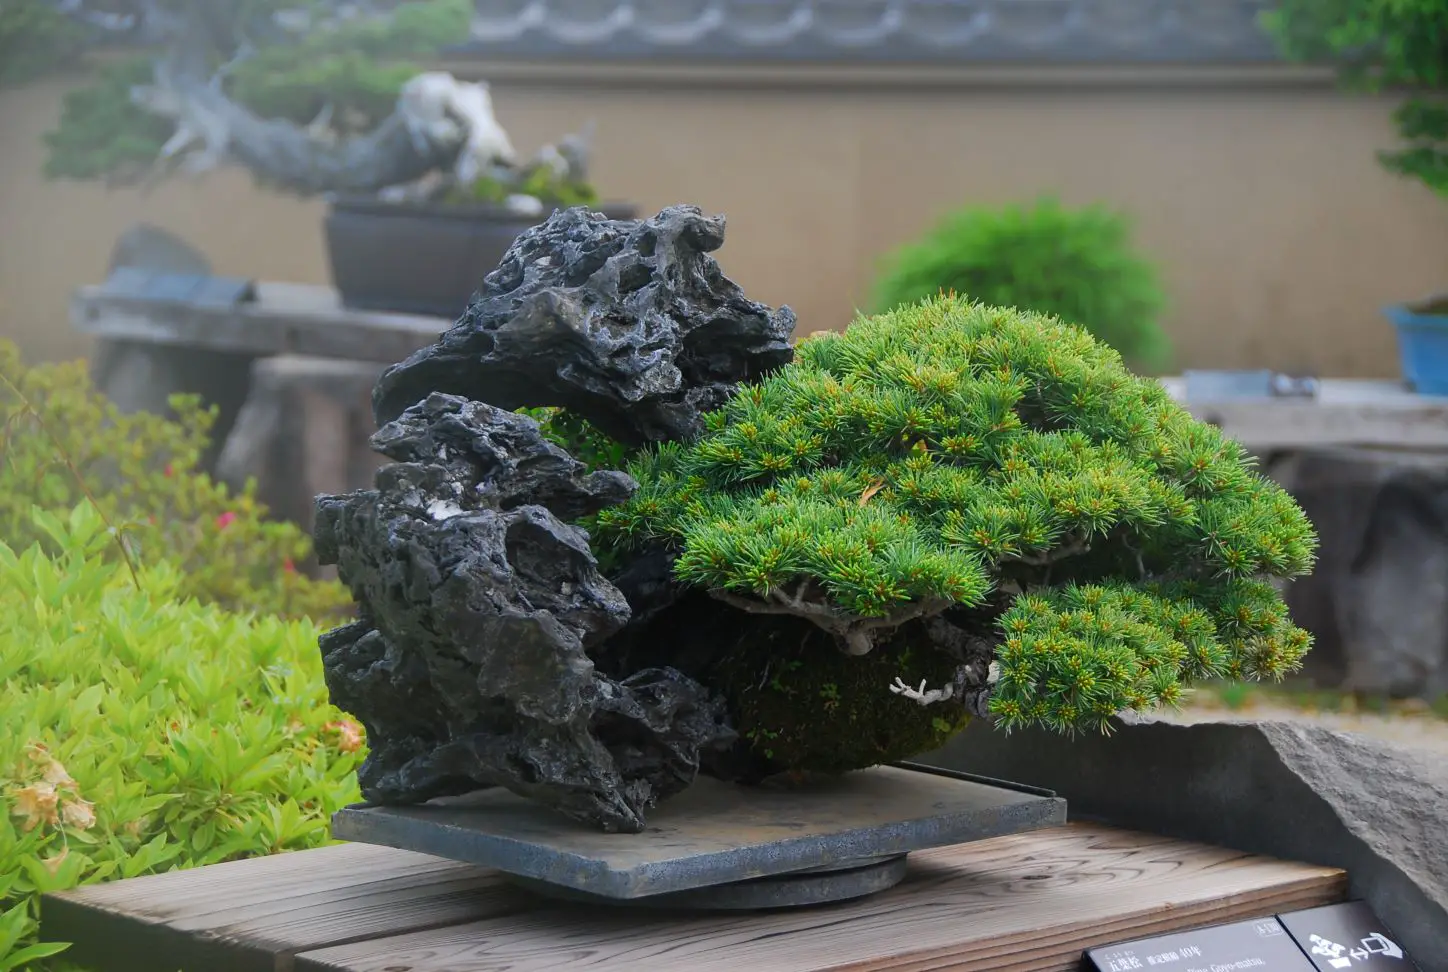
Uniqueness of rock style bonsai
What sets the rock style bonsai apart is the visual impact it creates. The combination of a carefully selected rock and the well-shaped tree results in a unique and captivating display. In bonsai on rock, the rock itself becomes an integral part of the composition, serving as both the subject and a crucial component in bonsai as a whole.
Creating a rock style bonsai requires a deep understanding of both the principles of bonsai design and the unique characteristics of rocks. It involves careful selection of appropriate tree species, thoughtful consideration of rock shapes and textures, and skillful techniques to integrate the two seamlessly.
Types of rock style bonsai
There are two types of rock bonsai styles:
- Planting and attaching tree(s) to a rock without using a pot, and
- Planting a tree with a rock in a pot, with the roots wrapping around and crawling down the stone into the pot.
The First Type

Attaching trees to a rock without a pot
The Second Type

Planting a tree in a pot with the roots wrapping around a rock
In this article, I’m going to call the first type “bonsai on rock”, and the second type “root over rock bonsai”.
How to start rock style bonsai: Preparation
When to start rock style bonsai

Cliff (bonsai on rock)
Rock style bonsai should be created during specific periods of the year depending on the type of tree.
Rock style bonsai with deciduous trees are best to work with from March to April, just before new buds appear in spring. For coniferous trees, on the other hand, it is recommended to work from mid-April to late May when the weather is getting warmer.
In regions with warm winters, bonsai on rock can be made in the fall, say around October. In regions with normal cold winters, however, it is preferable to do it in the spring. In these regions, your new bonsai may wither during the winter without special facilities to protect it from the cold if done in the fall.
Removing the tree out of the pot and attaching it to a rock is a very stressful process and making one in the best season will ensure the optimal conditions for the healthy growth and development of your new bonsai tree.
Essential tools and materials
You need some specific tools and materials for a successful and visually appealing bonsai. Here are the essential tools and materials you’ll need, besides a rock and tree(s):
- Soil
- Wire and wirecutter
- Superglue
- Bonsai scissors
- Bonsai pot (for root over rock style)
- Accent elements (optional)
Soil
Rock style bonsai is different from regular bonsai as it involves attaching trees to a rock instead of just planting them in pots. This means it requires different types of soil.
Bonsai on rock (Type 1)
- Peat moss
- Akadama/ volcanic rock (small grain)
- Sphargum moss
When attaching the tree to the rock without using a pot, the soil needs to hold water well and above all, not flow out of the rock when watered. Sticky/clayey soil like peat moss works best for this purpose.
However, peat moss is very acidic. And if used alone, it can crack and become hard when it dries, which can harm the roots. The best way to prevent this is to mix small-grain Akadama or volcanic rock and sphagnum moss with peat moss.
Root over rock (Type 2)
- Peat moss
- Sphagnum moss
- Bonsai soil mix
Use peat moss and sphagnum moss for root over rock bonsai to wrap the roots around the rock. For the soil inside the pot, use regular bonsai soil mix for the type of tree you are making.
- Coniferous trees: Akadama/volcanic rock, river sand/pumice
- Deciduous/flowering/fruit trees: Akadama/volcanic rock, river sand/pumice, organic compost
Wire (and wirecutter)
Since attaching the tree to the rock is crucial in rock style bonsai, you need additional materials to secure anchoring. For this, wire is used to ensure a stable connection.
The wire should be strong enough to hold the tree firmly in place but also flexible enough to handle. Aluminum wire is commonly used for this purpose but any wire is OK as long as it is easy to work with and doesn’t rust. The color should be black or dark brown so that it would blend with the tree, rock and soil.
You might need a wirecutter as well. Having wire cutters on hand is not essential but very handy.
Superglue
The easiest way to attach the wire to the rock is to use superglue (and sand). You may drill a hole and insert a screw to secure the wire but you need a drill and drilling is time-consuming. You can also use cement but you don’t need a whole bag of it but just a tiny amount.
Superglue is just fine and common method of anchoring when creating rock bonsai.
Bonsai scissors
Pruning scissors are essential for cutting roots. Choose a high-quality pair with sharp blades that can make clean cuts without damaging the roots.
Bonsai pot (for root over rock style)
For root-over-rock style, select a bonsai pot that is suitable for accommodating the rock and tree. Preferably, it should be earthy in color so that the pot would not stand out from the tree and the rock.
Accent elements (optional)

Moss and small plants
Adding accent elements such as moss and small plants is a good idea. It would enhance the aesthetics of your rock style bonsai and really add a natural look to your bonsai.
Selecting a perfect rock
In rock style bonsai, the choice of the right rock is crucial as it serves as the foundation and subject of your bonsai along with the tree. The rock is an integral part of the composition and contributes to the overall aesthetic appeal of your bonsai creation.
Here are some key considerations when selecting the perfect rock for your rock style bonsai:
- Shape: Have interesting and intriguing shapes that evoke a sense of natural grandeur
- Size: Proportionate to the tree
- Hardness: Hard enough to withstand environmental conditions
- Texture and surface: Rough, jagged, or creviced
- Color: Calm and dark
- Stability: Not wobbly
If you want to explore more in detail how to choose a rock for rock bonsai, the following article shows exactly how.

I found this rock in a river bed the other day. Though I like the color, it doesn’t have an interesting shape to be used as a rock for bonsai making.
When searching for the perfect rock, explore local gardening stores and landscape suppliers. You can go to rivers and mountains and find rocks that suit your vision (and it’s free!). Take your time to examine the unique qualities of different rocks before making your final selection.
Remember, the rock you choose will be an integral part of your rock style bonsai. So, choose carefully and wisely.
Choosing the right tree species

Rock bonsai (juniper)
Selecting the right tree species is another crucial part of creating a rock style bonsai. The tree should complement the chosen rock, reflecting the natural environment in which it appears to grow.
Any tree species can be used for bonsai on rock but trees with the following characteristics are desirable for this style.
-
- Small leaf size
- Abundant foliage
- Thick trunk
- Dwarf nature
- Roots thickning fast
- Lots of fine roots
- Resistant to drying
Pines, spruce, juniper, Japanese maple, trident maple and azalea are a few examples of species commonly used in rock style bonsai.
I’ve written a whole chapter on how to select the best species for rock bonsai in detail. If you are interested, please check the following link below.
How to start rock style bonsai: A step-by-step guide
Creating a rock style bonsai requires careful planning, precise execution, and a touch of artistic vision. Follow the following step-by-step guidelines to bring your rock style bonsai to life.
Step 1: Gather the necessary tools and materials
Collect all the essential materials and tools required for creating bonsai on rock.
- Soil
- Wire and wirecutter
- Superglue
- Bonsai scissors
- Bonsai pot (for root over rock)
- Accent elements (optional)
Make sure you have everything you need before proceeding to the next step.
Step 2: Select the rock
Choose a rock that aligns with your vision and meets the criteria mentioned in the “Selecting the Perfect Rock” section. Consider its appearance, size, stability, and compatibility with the chosen tree species. Take your time to find a rock that captivates you and complements the overall design you have in mind.
Step 3: Choose the tree
Select a tree species that harmonizes with the rock and suits the environmental conditions of your location. Make sure that it complements the rock in terms of size, color of the foliage and overall visual harmony.
Step 4: Decide the composition
Choose the front of the rock

Choose the front
The first step in determining the overall composition of bonsai on rock is deciding the “front” of the rock. Just like a bonsai tree, rock has a “front”. The front of a rock is the side that shows the most beautiful shape, pattern and color when looking at the rock from the viewing angle.
If you can’t decide on the front right away, try flipping it upside down or intentionally placing it at an angle that is harder to place on the ground. You may find a different “face” of the rock.
If the rock has an undesirable feature, consider whether it can be hidden by choosing a different angle or covered by trees.
Decide where to place the tree

Place the tree
Once you determine the front of the rock, the next step is to think about the placement of the tree(s) to be attached. Try placing a tree in different places to see if there is a good composition.
- Decide on a position that gives the strongest impression to the viewer.
- When attaching several trees to the rock, place the trees in a balanced position on the rock as a whole.
- Determine the composition so that the trees match the direction of the stone.
Step 5: Prepare the rock
Adjusting (optional)
Prepare the rock for planting. Once you decided on the composition, necessary adjustments should be done before attaching the tree.
It is generally recommended to avoid altering the rock in any way but there are instances where some reshaping may be necessary. For instance, if the rock is unstable when trees are attached, modification is necessary to ensure a secure and stable planting. Or dents, holes or crevices need to be made if there are no suitable locations to plant the tree.
Use a drill or chisel to make the necessary adjustments.
Attach wire to the rock
To attach the tree to the rock, wires should be attached to the rock before that using super glue. Use a small gauge wire and attach it where trees and roots are to be placed. It is always good to apply more than necessary just in case.
Here’s what you should do to attach the wire to the rock.
- To secure the wire in place, start by placing a small amount of sand where the wire will be positioned.
- Apply super glue to the sand a bit more than necessary.
- Then, position the wire on top of the sand and glue and add more sand on top of it.
- Allow sufficient time for the glue to harden and set.
Step 6: Mix the soil
Bonsai on rock
Mix the soil in the following proportion: peat moss 6, Akadama 3, and sphagnum moss 1.
If you want the trunk to grow thicker quickly, you can increase the amount of Akadama/ volcanic soil. Adding more of them to the soil mix improves oxygen flow to the roots, helping trunks and branches to thicken faster.
Root over rock
For root over rock bonsai, mix peat moss and sphagnum moss in an 8:2 proportion. Bonsai soil mix in the pot depends on the species.
Basic soil mix by species
| Coniferous | Deciduous | Flower/fruit | |
| Akadama/ Lava rock |
60% | 70% | 60% |
| River sand/ pumice | 40% | 20% | 20% |
| Organic compost |
– | 10% | 20% |
For more on how to mix bonsai soil, please read the following article.
Step 7: Undercoat with the soil mix
Apply a layer of soil about a half to 3/4 inch (1-2 cm) thick to the areas where the tree and roots will be placed as an undercoat. When attaching multiple trees, it is good for trees’ health if all the soil around the trees are interconnected on the rock.
If the tree vigor appears slightly weak before planting, you can add sphagnum moss or powdered Akadama soil on top of this substrate to provide additional support.
Step 8: Prepare roots
Take the tree out of the pot. Carefully remove the soil from the roots and loosen any tangles. Remove any dead, damaged, or excessively long roots.
Step 7: Attach the tree to the rock
Position the tree on the rock according to the composition you decided earlier. When attaching two or more trees, arrange them in order of size from the largest to small, and make sure the trees and the rock are in a balanced and harmonious arrangement.
Bonsai on rock (Type 1)
If roots are longer than the dent in the rock, try wrapping them around a small augmentation and cover them with soil. Avoid cutting long roots as much as possible. Instead, gently bend them and bury them in the soil.
When planting multiple trees, it is better to connect the soil around the trees to retain moisture and share nutrients.
Root over rock (Type 2)
In the case of root over rock bonsai, align the roots with the crevices of the rock and allow the roots to extend towards the pot.
Carefully wrap the roots around and down the crevices in the rock towards the pot. Make sure the roots make good contact with the undercoated soil to facilitate water and nutrient absorption.
Step 8: Secure the tree and the roots
Use wire that you attached to the rock to securely fasten the tree to the rock to make sure the tree does not come loose. Place a protective piece (rubber or similar material) where the wire comes directly into contact with the root to prevent damage.
If you are not using wire to anchor the roots, you can use a string (preferably from natural material) to wrap around the roots and the rock. This helps prevent them from floating or shifting.
Step 9: Overcoat with the soil mix
Gently distribute the mixed soil over the roots of the tree. Adjust the thickness of the soil depending on the location to create variation and visual interest. Apply an ample amount of soil to make sure the tree stays healthy and the wire used for securing the tree does not remain visible.
If the soil seems to flow out, you can use a thin mesh or netting made from natural materials such as cotton and tie it securely with a string or thread. Or, you can cover it with sphagnum moss (but it tends to come off when it gets dry).
When using a pot, position the roots downward and fill the pot with soil. After a year or two, the mesh will naturally decompose, allowing the soil to flake off and expose the roots when the roots grow stronger.
Step 10: Finishing touches
Apply moss and/or small plants to prevent the soil from flowing out and to enhance the overall aesthetic of your bonsai. You can remove excess foliage and unnecessary branches but do not do aggressive styling by wiring, which can be done after a year of nourishing the tree on the rock.
Step 11: Aftercare
After attaching the tree to the rock, keep the bonsai in a shaded area for about a week. During this period, mist the tree and the roots periodically with water. After that, move the tree to a sunny location and continue regular care and maintenance.
For ongoing care for your newly created rock bonsai, please read the following post.